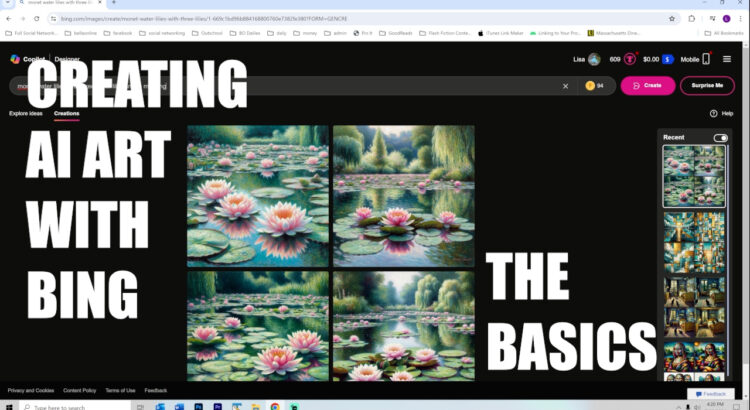
Bing provides a free way to generate AI / Artificial Intelligence artwork on demand. You type in a prompt – a description like “three pink water lilies on a pond in Monet style”. In about thirty seconds, Bing provides you four different image variations on your chosen prompt. Then you can alter your prompt and try again.
In 2024, the BVAA hosted our annual Carbon Copies show which is all about fakes, forgeries, alternative versions of art, and fun explorations. For his submission to this show, Evan Plante submitted what was our first ever AI / Artificial Intelligence submission to an art show. He used the program from Bing (Microsoft). Evan wanted a new version of the classic Mona Lisa, an oil painting by Leonardo da Vinci from around 1517.
So what Evan did was go to the Bing AI Art website:
Evan created a free account with Microsoft. Then he typed in a prompt – a brief description of what he wanted. In 30 seconds, Bing had generated four versions of an image. Evan changed his prompt to better reflect his vision. In another 30 seconds, Bing generated this result (and three others):
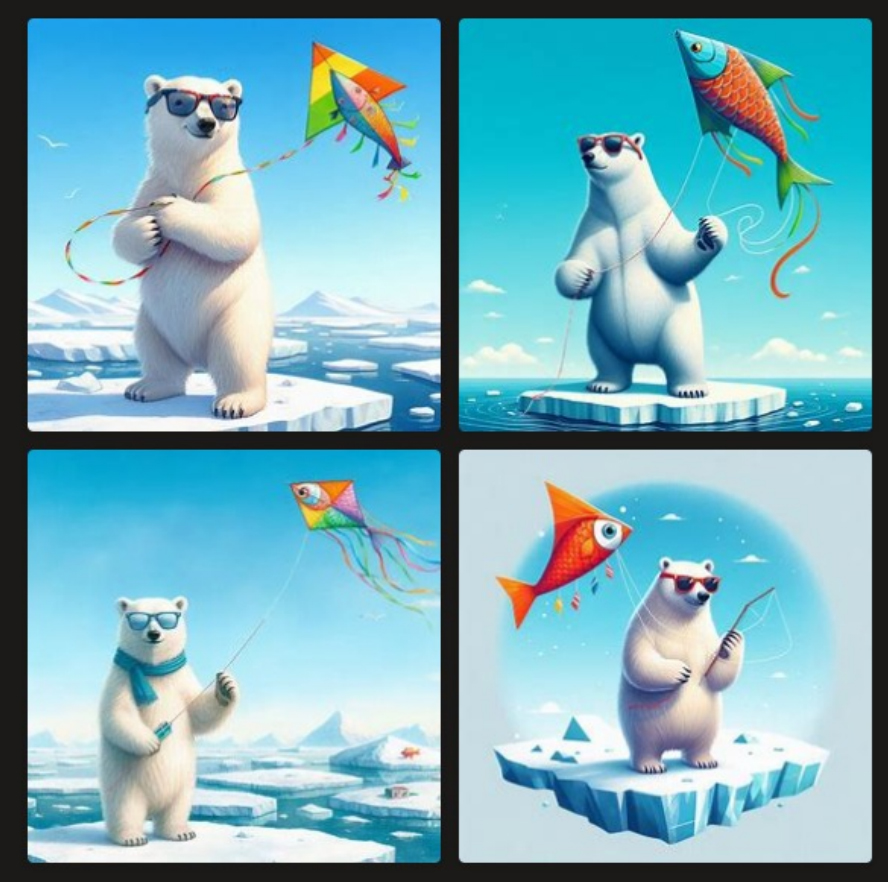
As a later test for me, Evan typed in “polar bear flying a kite”. In 30 seconds Bing generated these results:
Here is a video version of the process, to see how this works:
Here is the link to our Carbon Copies show details, to show what our forgeries show is all about.
Many of our artists were intrigued by the AI art submission and wanted to understand how this process worked. I hope this write-up and video help explain the process.
Ask with any questions about Bing / Microsoft AI art or about AI art in general!
The Blackstone Valley Art Association has been doing a number of its art shows online in a virtual format. To do these, we arrange JPGs of the art in a slideshow format and then have the artist provide a narration to go with them.
The artist can speak at any speed they wish, and for as long as they wish. We will arrange the JPGs of the art to match along with the words.
The artist should have a computer with a microphone (built-in is fine) or a smartphone.
Luke MacNeil has kindly created this how-to for any artists who are using a Mac computer.
For those on a Windows PC, here are the steps. It might vary slightly depending on which versions of Windows you are using.
First, click the Windows icon in the lower left. You should be able to find “Sound Recorder” under Windows Accessories. In Windows 10 it is called “Voice Recorder”. Either way, if you search for “recorder” you should find it.
The recording function is fairly straightforward. You press the button to start recording. You talk. You press again to stop. If you want to do another take, just press the button fresh. Eventually you get a take that you like. If you need to do it in segments, that’s fine. That way you get each segment the way you like it and send those final segments along to us.
Making Recordings with your Smartphone
Your phone has a built-in microphone. It’s how it can hear you when you make phonecalls. It should also have a built in sound recorder. Look through your apps and you should find it. Again, just press the button to start recording, say what you want, and then press again to stop recording.
You’ve probably seen charity donation requests on Facebook. Maybe someone is having a birthday and they’d like people to donate to their favorite charity. Maybe they are doing a Facebook Live presentation and the request is for people to donate to a charity.
How does a group get their name onto that list of charities, so they can be chosen?
First off, you do have to be an official non-profit organization. Every state and country has its own rules about how to acquire that non-profit ID. Check with your state or country to figure out the steps, and go through them.
In the US, you are required to have a 501(c)(3) organization with a Tax ID number. You also need an official bank account associated with that non-profit, that will receive the funds.
You need a Facebook page for your charity, so people know where to connect to.
Once those things are set, then you follow these instructions to enable your Facebook page for your charity’s donations.
Making one-minute time lapse videos is an incredibly useful skill to learn. Sure, it’s lovely to have that 20-minute or 30-minute narrated walkthrough of how to paint something. But then it’s also very helpful for marketing to have a one-minute time lapse version, start to finish.
The one-minute video version can then be posted on Instagram, Twitter, and TikTok – all platforms that have a short length limit. You can use those other feeds to catch viewers’ attention and then direct them to YouTube or Facebook or wherever else you have the full length video posted.
Here’s how to do this in Adobe Premiere. If you’re using another software package, let us know what it is and we’ll help you figure out the steps.
Adobe Premiere
Open up your video file in Adobe Premiere. You probably already have it in there from making the full length video. For this short version, don’t bother with any title screens or anything else. You just want the video itself.
Click on the video-audio pairing to select it. Right-click and unlink the audio-video. Click OFF the video-audio so they are unselected. Then click just on the audio track. Delete it. Otherwise you’ll get chipmunk-audio when you shrink the time.
Right-click on the video track. Go into Time Stretch. You want the number to be BIGGER THAN 100 to speed it up. If your clip is 10 minutes and you want it to be 1 minute, change that 100 to 1000. See what the time is. If it’s still longer than 1 minute, increase that 1000 slowly until you get under 1 minute.
For YouTube / Facebook – Publish/Share, Computer, MPEG, and I use HDTV 1080 24p. The file it makes will be great for those two platforms.
For Instagram / Twitter / TikTok – Publish/Share, Mobile, iPad, iPad widescreen high quality. This is the file format those platforms use. When loading onto TikTok make sure you rotate your video on the first screen so it fills the window.
If you posted a video to Facebook live, there are a variety of reasons that you might not have any other backup copy available to work with. That means if you then wanted to load that same video onto YouTube or for other purposes, you’re stuck. Here is how to download that Facebook Live video from Facebook to your computer, so you can use it for whatever purpose you wish.
First, log into your Facebook account on a computer.
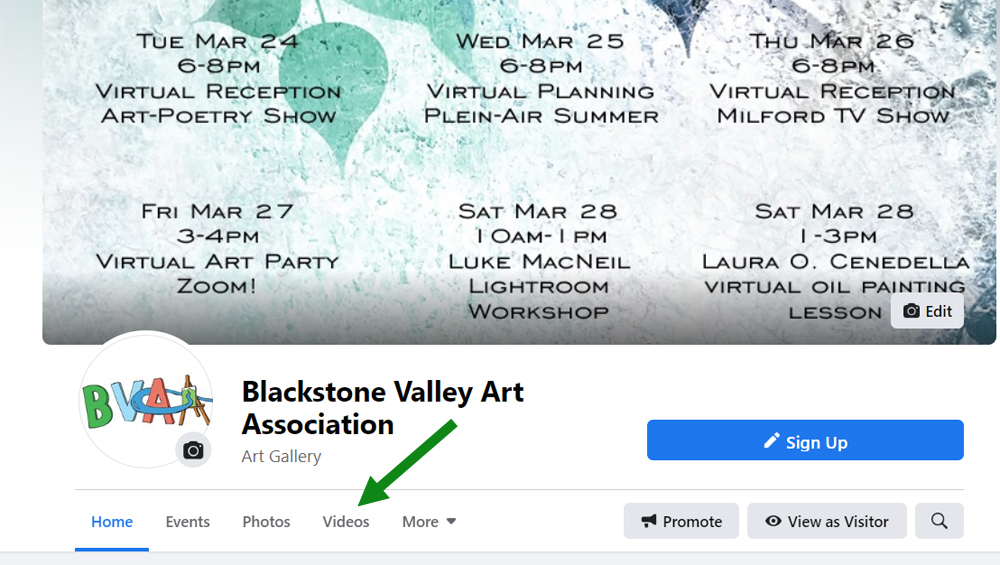
Go to your video area. Usually there is a ‘videos’ tab beneath your main profile banner image.
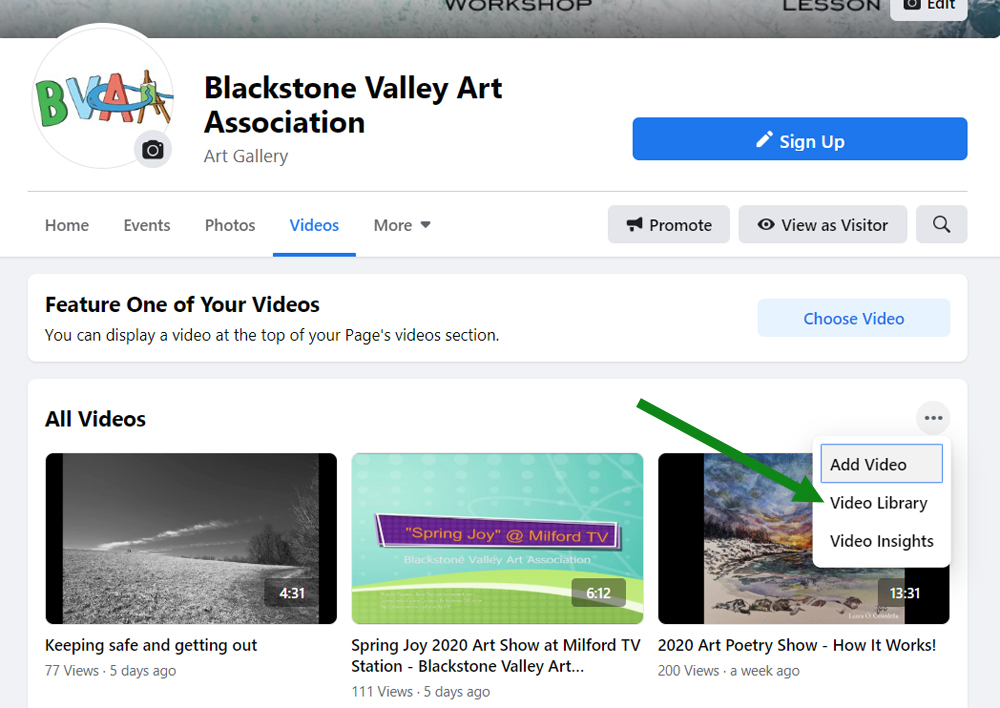
You should see “All Videos”. Click on the … on the right side.
Go to your Video Library.
Point to the Facebook Live video in question. As you hover over the video link, you should get an EDIT option to the right of the video title.
You’re now on the edit page for your Facebook Live video. There is another … area in the lower middle. Click on that … option.
You’ll now have an option to DOWNLOAD your video.
Save the video onto your local hard drive.
You now have a video to work with!
Note that if you originally uploaded your video from an old-school cellphone, the quality isn’t going to be great. That’s just a fact of life. So for example I use a Samsung 7 cellphone. When I download my Facebook Live video, the video I get is:
for a 3 hour video: Frame size: 640 x 360 Frame Rate: 23 frames/second Audio bit rate: 63 kbps / stereo Audio sample rate: 24 kHz total file size: 619mb
So again you can’t really blame Facebook for this. They were handling a live stream out of a cellphone. We’re fortunate that even works :).
So then the question is, how do you bring this MP4 file into something like Adobe Premiere in order to work with it?
It turns out that 23 frames/second caused problems for me while working with Adobe Premiere, my video editing software. My cellphone/Facebook Live combo created a “variable frame rate”. If you run into that sort of a problem, where the audio / video don’t remain synced properly, you want to download Handbrake:
This is FREE. It will let you convert the file from variable frame rate to a fixed 30 frames per second rate. This then imports perfectly into Adobe Premiere and other packages. You can then edit it like any other video file, add titles, and then save it for YouTube or other uses.
Let us know if you have any questions about downloading your live videos from Facebook Live!
Luke has written AMAZING step by step instructions on how to do Facebook Live from your computer. This involves “OBS” software which lets you mix in various microphones, cameras, etc. if you wish to. It has all sorts of features.
But you can also use just one webcam, one microphone, and do a wonderful job.
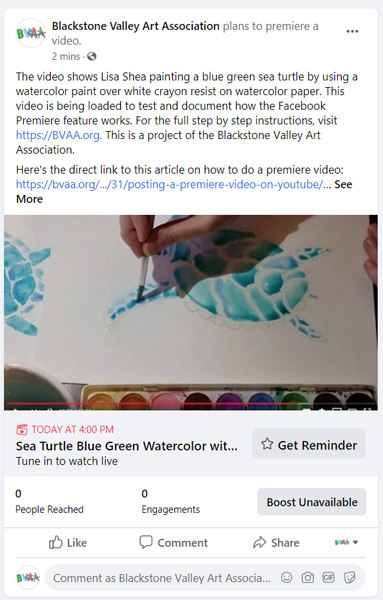
When you post a video on Facebook with a premiere status, what does that mean? How is that different from a standard Facebook video?
These simple how-to instructions will get you on the right path!
First off, you need a video to post. Be sure to read our simple step-by-step instructions on how to shoot a video with your cellphone. It’ll get you started so you can test this out.
Once you have a video file ready, it’s time to learn about the Premiere option in Facebook.
What is a Premiere Video?
The concept of a premiere video is that it “becomes visible” at a specific date and time. Think of it like an award ceremony. Lots of people tune in at 8pm EST at a specific date to see it at its very first showing. They want to all be part of that initial showing. After that, lots of people can re-watch it endlessly. So the video is available long term for those later viewers. It has all the same features as a ‘normal’ video. Its special bonus is that it had the premiere launch when it very first was shown to the public.
You pre-load your premiere video ahead of time. Let’s say a video was going to go live on May 1 at 8pm. I could post the video into the systems on April 28th so everything was set. I could schedule it for a release time of May 1 at 8pm EST. I now have a URL I can send out to everybody letting them know where that premiere is going to be held. That means I can get a lot of publicity for that URL. People going to the URL will see the count-down clock of how long until the video is visible.
This makes it easier for people to all get to the video for its launch.
A Premiere Video lets people chat and talk about the video while it’s playing that first time. It makes the event a community event. And then, after that first playing, the video is available for anybody to watch and rewatch.
In order to set up a premiere video, you need the video to be complete. So be sure to look at our other how-do that talks about how to make the video in the first place.
Posting a Premiere Video on Facebook
Here are the steps for posting a Premiere video. Unlike posting a regular video, which is simply done as a traditional post, there are a few extra steps to putting a video live in premiere status.
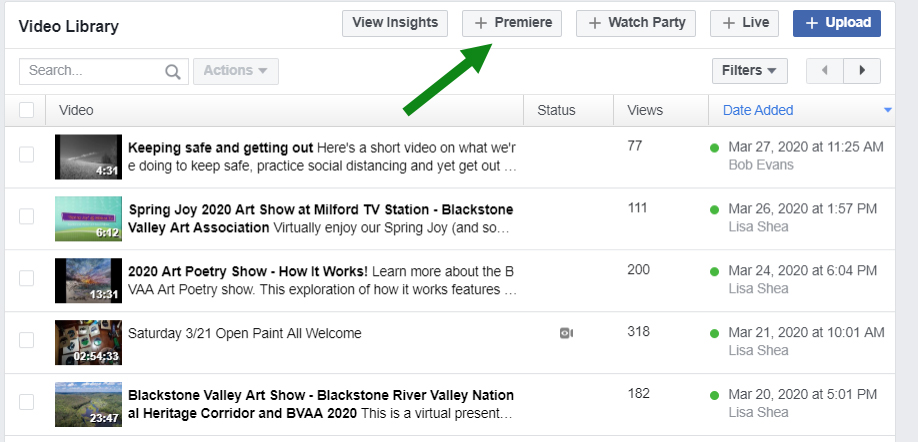
First, on a computer, go to your main YouTube page. These examples use the BVAA Facebook fan / business page, but you can do this on a personal page as well. Look for a link for your video area. There might be a word “video” beneath your main banner. It might be hidden under the “more” tab. Different layouts have different options visible. Find that video area.
Once you’re in your video list, click the “…” area to get to the full video library listing.
On your video listing page, you’ll see a summary of all of your videos and their views. Any video you ran initially as a ‘live’ video will have a little video camera icon in its status column. At the top, there should be a link to create a new premiere video.
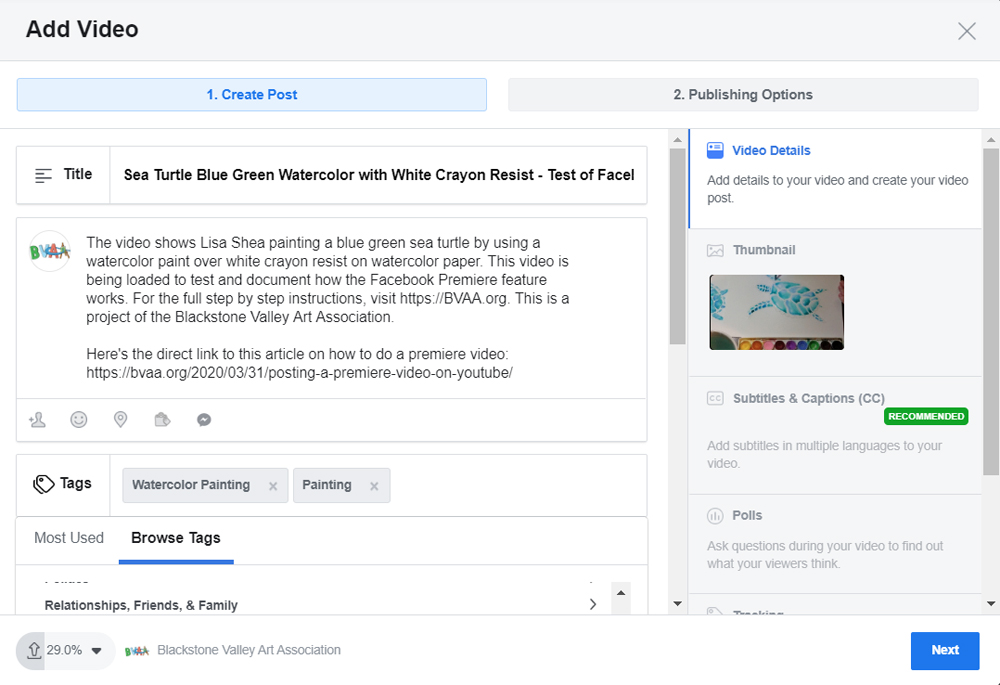
When you click that link, you’ll get a prompt to select your video on your hard drive. Browse to find your video, and start it loading up. While it is loading, you can edit its details.
On the first of the two tabs, put in a title that has key words so you’re found when people search on your topic. Have it be meaningful at the same time. The description can hold a more complete explanation about your video. Give it a few ‘tags’ – i.e. key words – to help it get found.
You can see in the lower left that this video is still loading.
Click ‘Next’.
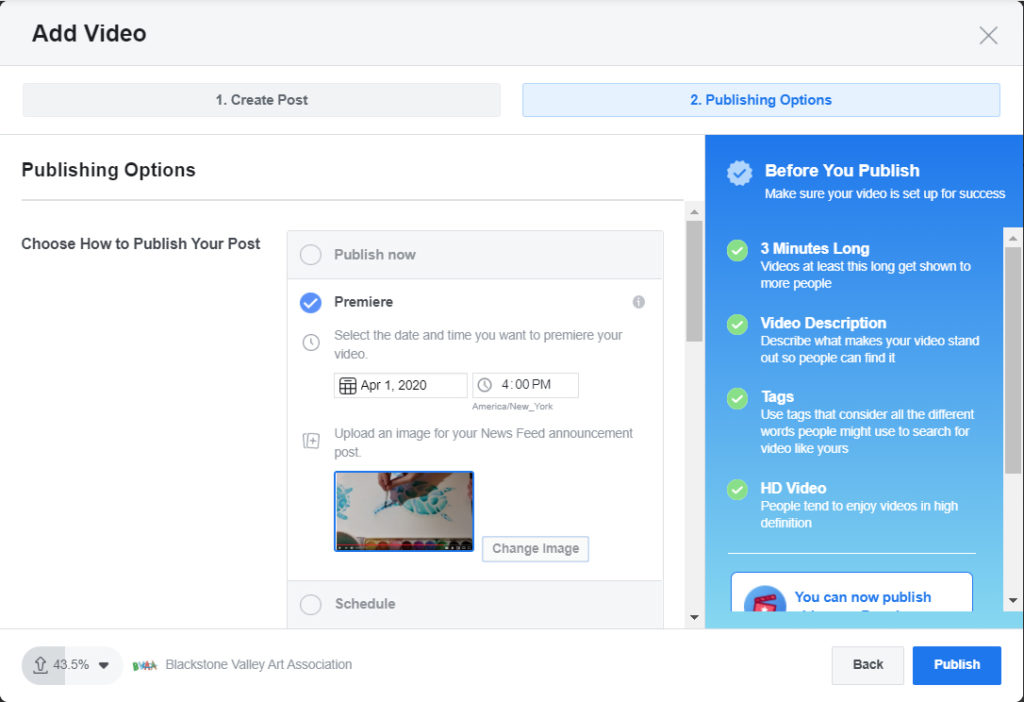
This second page sets the premiere start date and time for this video. You can set any future date. YOUR VIDEO WILL TAKE TIME TO LOAD. Don’t try to do this at the last minute with only 10 minutes to spare. It could easily take the video a half hour to load in and then another 10 minutes after that for internal processing. Load your video up at least two hours ahead of time, to be ready for the premiere. This gives you time to publicize that the launch is coming.
You can set a featured image to go with your premiere, if you want. If that’s tricky for you to figure out, don’t worry about that. You don’t need it. I just used a screenshot from the video.
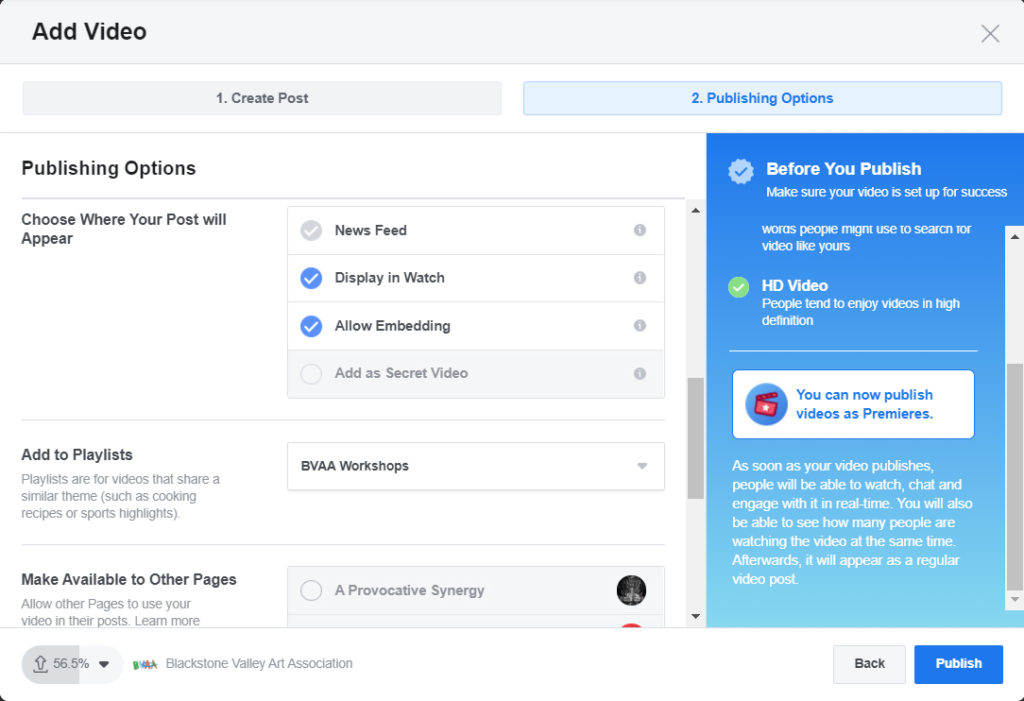
You can ‘scroll down’ in both the left-hand and right-hand areas.
This area is ALL OPTIONAL. If you want to make playlists to organize your videos into groupings, you can do that. You don’t have to. If you want to cross-promote this video on other pages you run, you can do that, too. You don’t have to. All you need to set is that top-area date and time.
When you’re ready with these details, click PUBLISH in the bottom right.
Your video will continue loading and then processing until it is ready.
You’ll see an entry show up on your video listing, showing this video as preparing to be posted in a premiere state. In the status area there will be a “clapboard” showing this is a scheduled premiere event. If you point your mouse at that clapboard icon, a helpful note will show up saying “Scheduled premiere”.
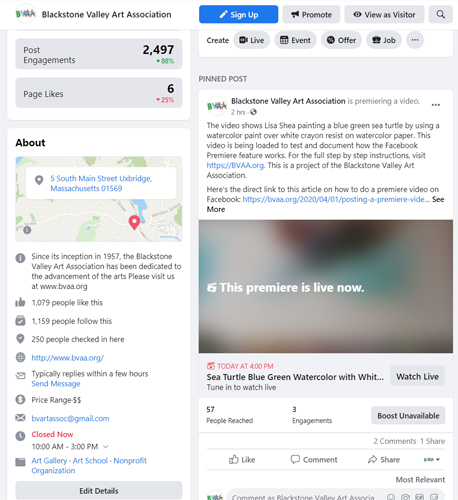
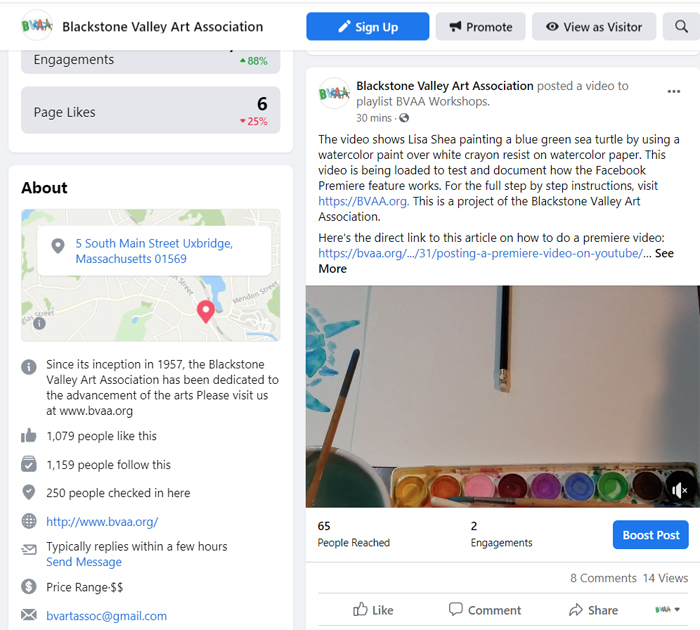
When the video is processed and fully in the Facebook system, Facebook will make a promotional post for you, touting this upcoming premiere of your new video. It’ll have the launch date in red beneath the image you chose to represent your video. It’ll show your description and title. It’ll encourage people to come watch the video during this special premiere period.
This right here is a key benefit of the premiere system. You now have a promotional post you can share, share, share with family and friends. They can share it for you. This promotion can be seen by thousands of people. Everyone will be reminded by Facebook it’s coming up, encouraged to attend, etc. etc. It becomes an “event”. People know exactly where to go to see the video at that launch date and time.
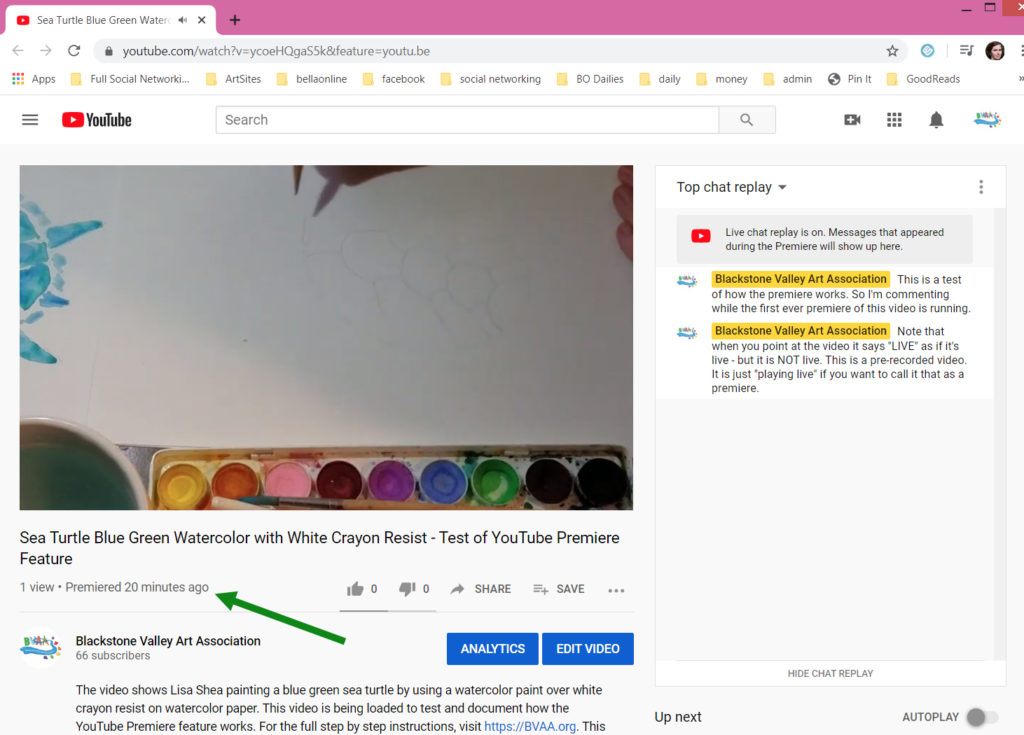
Note that the text under the image says “Tune in to watch live”. That’s a bit confusing, and both YouTube and Facebook have this same issue. The video is NOT LIVE in the sense of the artist being there, live, doing the actions. It is a pre-recorded video. I suppose the viewer is watching the premiere “live” as it premieres, but that is a confusing way of expressing it. Just know, as an artist, that you are NOT live in this situation. This is a pre-recorded video you posted and is all set. The only component of this that you do live is that you can chat live with guests in the comment area while the video is running on this very first premiere launch.
When the premiere starts, every link to the video now changes to have a watch live button. The screen area itself says that the premiere is live. Again, to clarify, YOU ARE NOT LIVE. The video is running. I know it’s confusing.
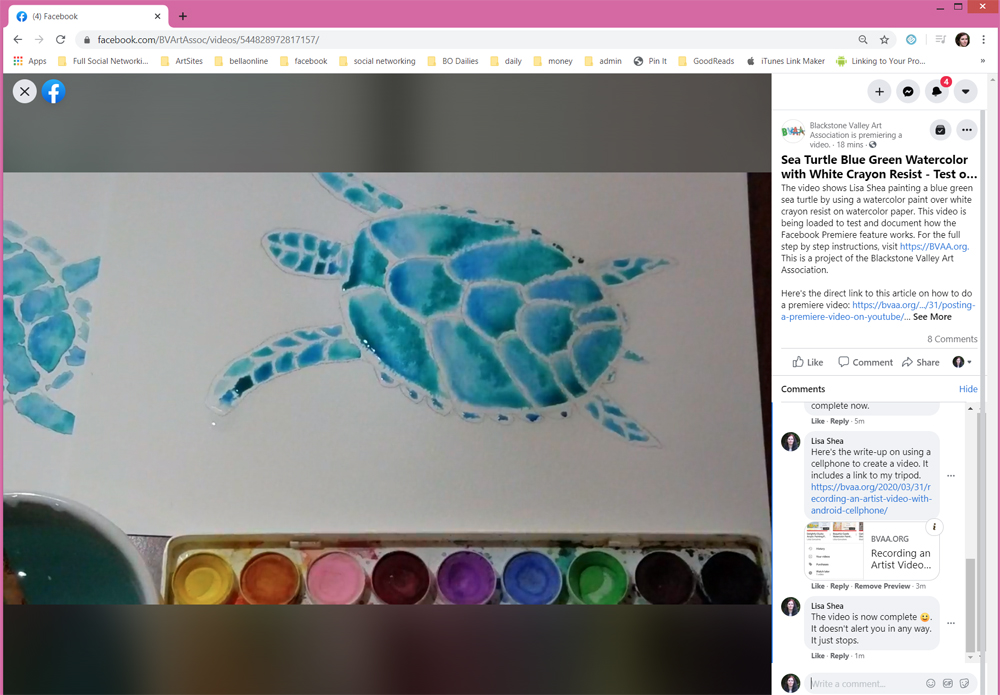
This is the view from someone watching the video. It says in the top area that this is a PREMIERE. Note that there is no sense at all of how long this premiere is going to last. So it’s a good idea to mention to people how long this is going to go on for.
People can comment while the premiere is running. All of those comments are saved with the video, so people watching later can see them.
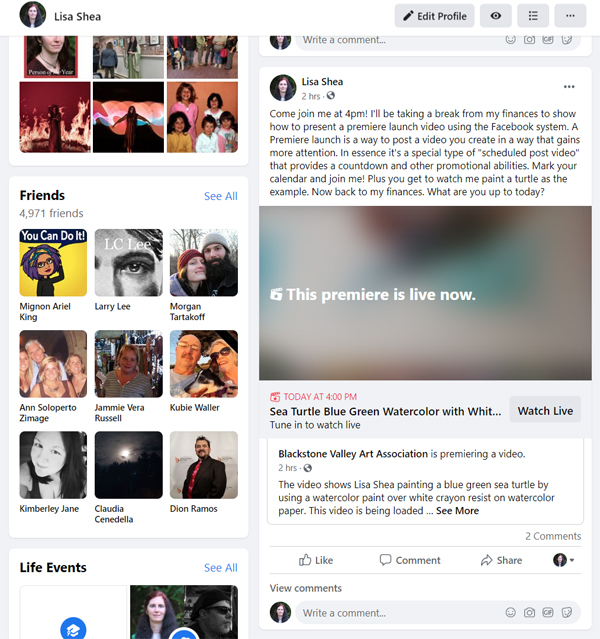
This premiere was run on the BVAA page. I shared it to my personal Lisa Shea page to let family and friends know it was going on. Here is the post on the Lisa Shea page. Note how it also lets people the video is now in its premiere state and can be watched.
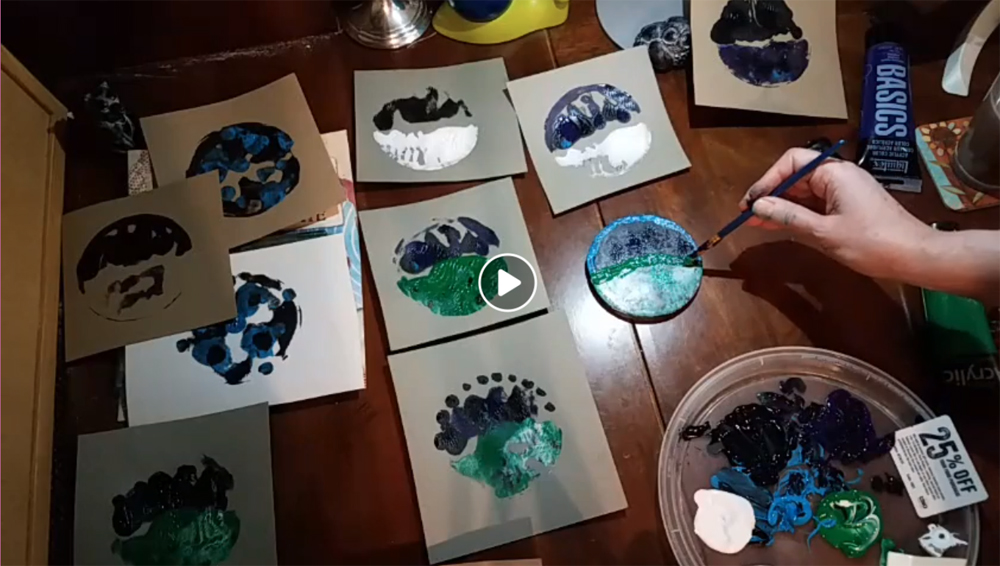
This is further in the premiere process. The turtle is still being painted. You can see the comments being made on the right-hand side. It still says in that top left area that this is a PREMIERE.
Then the video ends. It just stops. It doesn’t “tell you” the video is done. The PREMIERE red alert in the top left goes away, but that’s it. So it’s good to have something in your video itself saying goodbye or such.
Now that the PREMIERE aspect of this video is done, the video acts like any other video in your library. There’s now a post in your timeline about this video including all the comments made during that premiere session.
If you go to the videos associated with the BVAA account, this video is now simply one of those videos, available for watching.
Ask with any questions.
Be sure to also read about how to post your video as a Premiere video on YouTube. It’s good to have your video in both systems, to reach both audiences.
As a note, there is video editing software created by Adobe called Adobe Premiere. That is wholly separate from the concept that YouTube and Facebook have of “launching a video as a premiere”. They just happen to be the same name.
Having a YouTube Premiere Video brings lots of benefits and views to your video.
Just what is a YouTube Premiere Video, and how do you load one up?
First, be sure to read our how-to write-up on how to make a video in the first place. That way you have the video complete and are prepared to share that video with your audience. This how-to is a very simple, basic one using your cellphone. No special software or editing needed.
Now that your video is recorded, it’s time to post it. Sure, you can simply just post it live on YouTube. But, instead, consider posting it as a premiere video. That gives you added benefit.
What is a Premiere Video?
The concept of a premiere video is that it “becomes visible” at a specific date and time. Think of it like an award ceremony. Lots of people tune in at 8pm EST at a specific date to see it at its very first showing. They want to all be part of that initial showing. After that, lots of people can re-watch it endlessly. So the video is available long term for those later viewers. It has all the same features as a ‘normal’ video. Its special bonus is that it had the premiere launch when it very first was shown to the public.
You pre-load your premiere video ahead of time. Let’s say a video was going to go live on May 1 at 8pm. I could post the video into the systems on April 28th so everything was set. I could schedule it for a release time of May 1 at 8pm EST. I now have a URL I can send out to everybody letting them know where that premiere is going to be held. That means I can get a lot of publicity for that URL. People going to the URL will see the count-down clock of how long until the video is visible.
This makes it easier for people to all get to the video for its launch.
A Premiere Video lets people chat and talk about the video while it’s playing that first time. It makes the event a community event. And then, after that first playing, the video is available for anybody to watch and rewatch.
In order to set up a premiere video, you need the video to be complete. So be sure to look at our other how-do that talks about how to make the video in the first place.
Posting a Premiere Video on YouTube
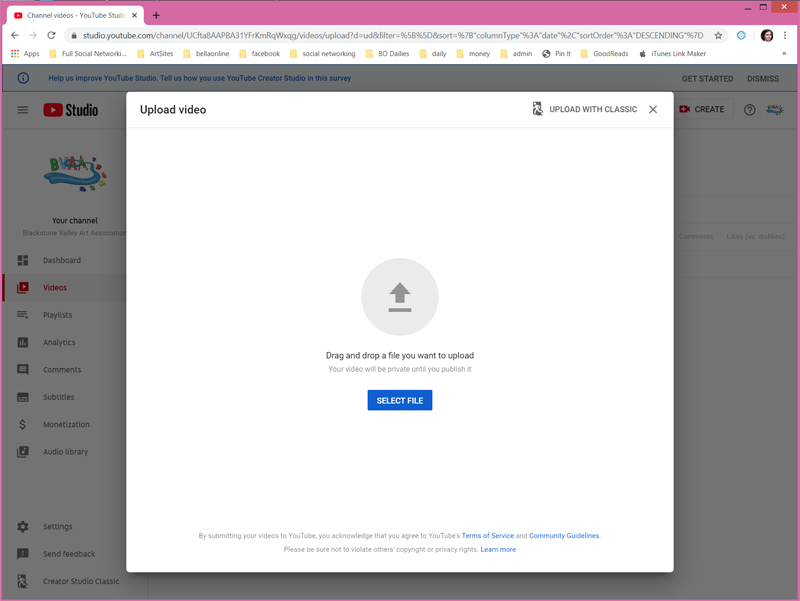
YOU CAN ONLY POST A YOUTUBE PREMIERE FROM YOUR COMPUTER. That’s it. I tried both the normal YouTube phone app as well as the specialized YouTube Studio phone app. Neither allow a premiere. I also checked the online documentation. So you must use your computer to load up a premiere.
You can still SHOOT your video on your cellphone. You then need to move the video onto your PC to actually load it onto YouTube, to be able to use the premiere option.
We’ll have separate instructions on how to get your video onto your computer, if you need help with that. There will also be separate instructions if you want to edit your video. This walkthrough is simply about how to get that video live into YouTube as a premiere.
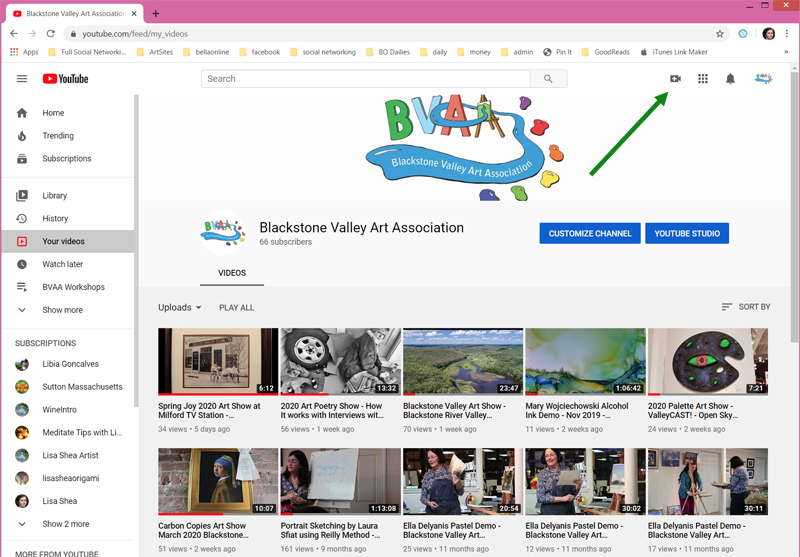
On your computer, go to YouTube.com. Log into your YouTube account.
Once you’re logged in, you should see a video camera silhouette in the top right.
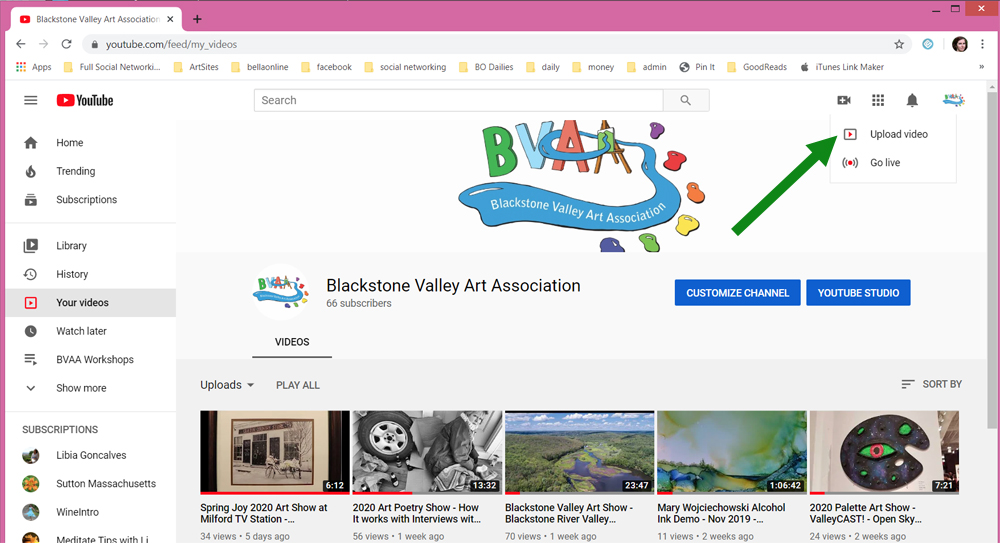
When you click that icon, you’ll get two options. Choose the Upload Video option.
You are now instructed to browse to find your video on your hard drive. Click to browse around. Figure out where you put your video, and click on it to select it.
Your video will start loading.
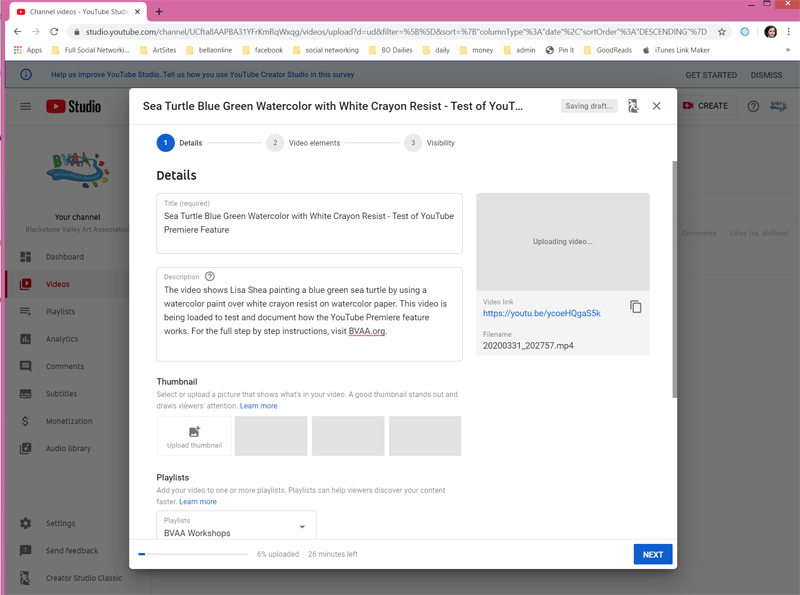
While the video is loading, you can set all the details for this video. You don’t have to wait.
For beginners, the only two things on this first tab are the title and description. Use a title full of key words people would search on. This is how people will find your video. At the same time, have it make sense as a title. Have your description be useful and descriptive.
Click Next.
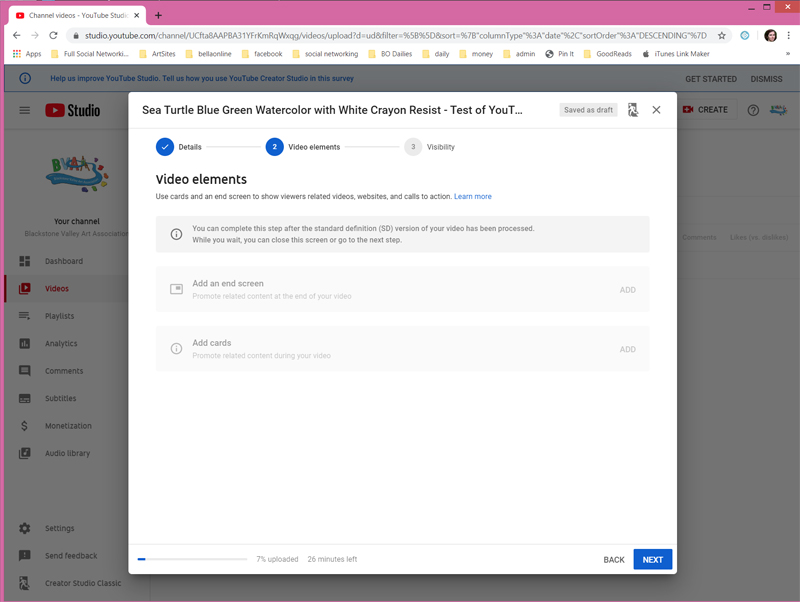
You can skip this entire second tab. You can worry about that sort of thing later on. For now, skip it.
Click Next.
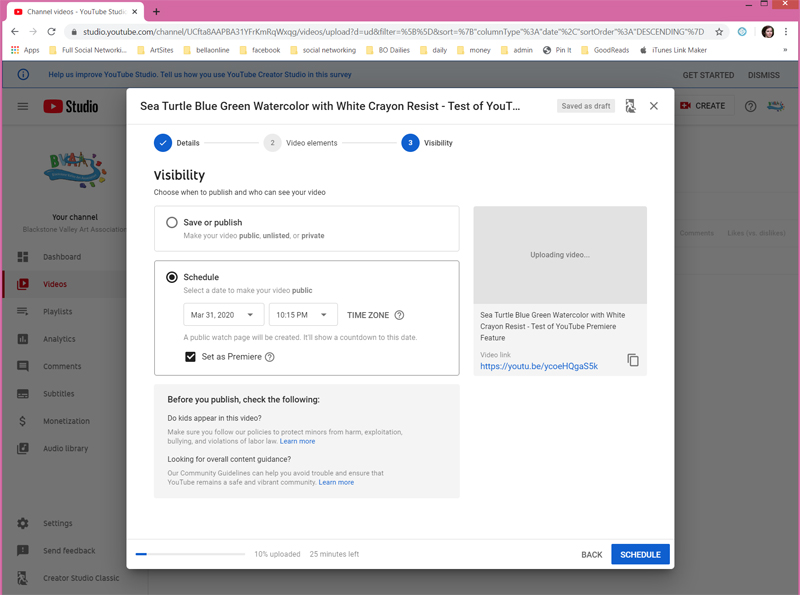
The third tab is where you set the scheduled launch date for your premiere. Note that once you save this you CANNOT CHANGE IT while it is loading. Loading can take a fair amount of time. A 20 minute video can take 25-30 minutes to load up. So give yourself some leeway in setting your premiere time. Don’t set it to be 15 minutes from now. Plan ahead.
I’ll note that after the loading stage comes the processing stage. If a video takes 30 minutes to load in, it can then take another 10 minutes to process before it’s available. You *can* edit the video values, including its premiere time, once it’s in the processing stage.
So again, to make this a premiere, choose the “schedule” radio button, put in a future time, and click the “Set as Premiere” button.
Then press SCHEDULE.
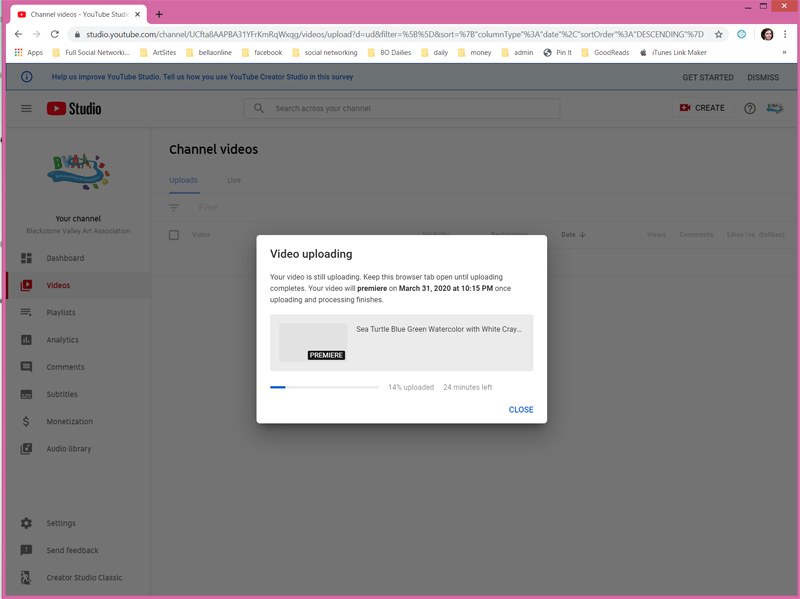
You’ll get a confirmation that everything is loading up. Leave this window open while the loading process goes through its stages. You can close the little white “Video Uploading” alert. Just be sure to leave that main browser window with YouTube open.
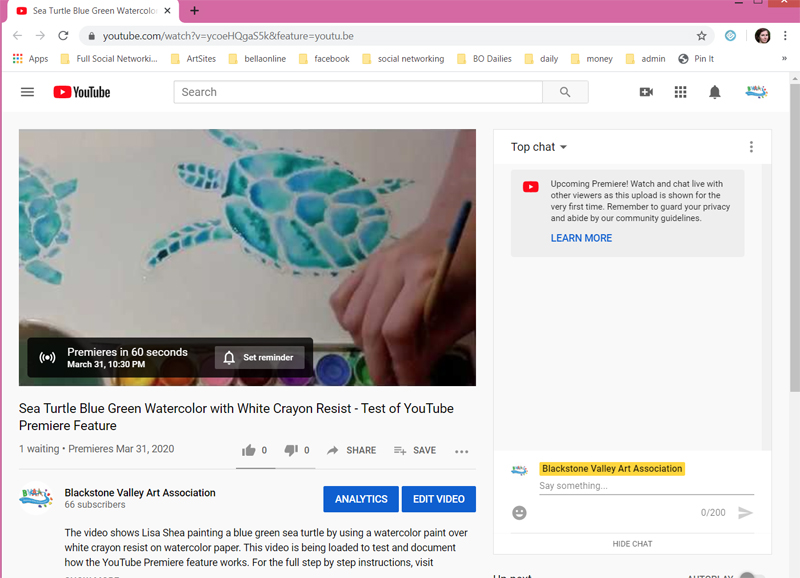
Visitors who go to your channel, or who get alerts from you with the destination URL, will see a special type of page that says the video is coming soon. They get a countdown once the time is within two minutes. All of this makes it easy to “congregate” people at the video all at the same time. If you look at the bottom of this video it says “Premieres in 60 seconds”.
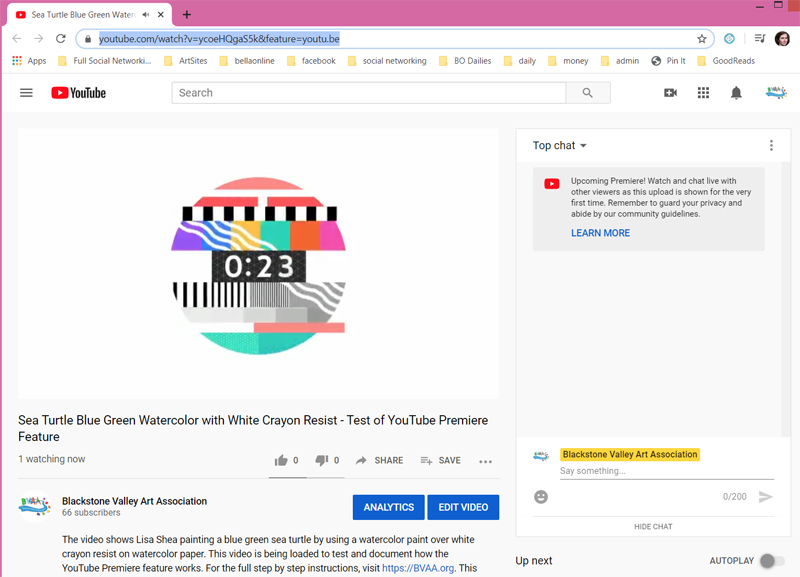
Here is the 2 minute countdown window. It is all done automatically, with music. This starts when the premiere time is reached.
On the right hand side, people can chat and make comments while the premiere is playing. When this first premiere run is complete, the video is then available like all other videos on YouTube for repeat watching. When people watch the video later on, they’ll be able to see those special comments that were made on the very first premiere of the video.
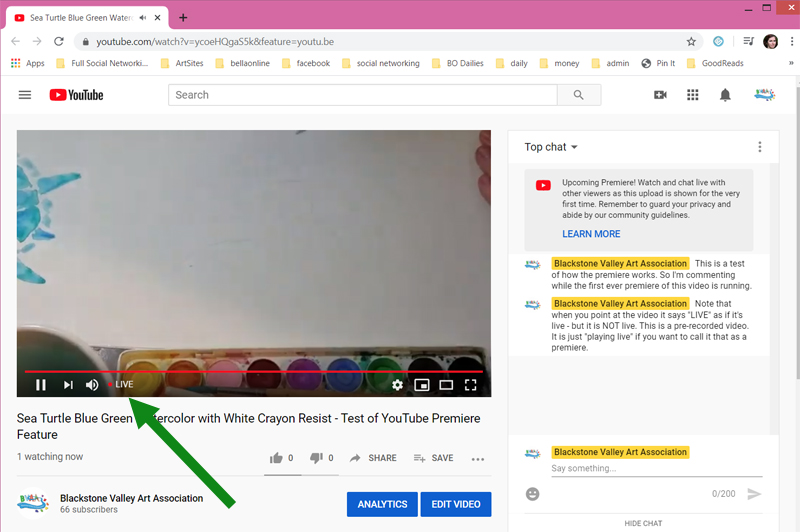
Here is what it looks like while it is playing in premiere mode. Note that when you point at the video, while it’s playing it SAYS it is live. But it is NOT LIVE. It is pre-recorded.
So, to be clear, THIS IS NOT A LIVE VIDEO. This video was not broadcast live. The video was made at the artist’s leisure. The artist got to play with the video until it was just right. When the video was ready, the artist then loaded that video into YouTube as a Premiere video. That gives this special method of putting the video live, in a way which draws more interest and which people can “enjoy together”.
Interestingly, as you watch this in its first premiere playing, watchers have NO idea of how much longer the video is going to run. There is no “end time” shown. So it’s a good idea to let people know in the description or something so they know how long this is going to go.
Here is the video now that the premiere is over. It indicates when that premiere first happened. It also lets you “re-watch” the appearance of the premiere conversation on the right hand side, if you want. The comments appear in the window right at the time (during the video) that they were initially typed in. So they make sense in context. You can hide that conversation, too, if you’d rather just watch the video.
Ask with any questions!
As a note, there is video editing software created by Adobe called Adobe Premiere. That is wholly separate from the concept that YouTube and Facebook have of “launching a video as a premiere”. They just happen to be the same name.
Here’s how to do the same premiere style event on Facebook –
Many artists are experimenting with how to record videos of themselves creating art, using their Android cellphone. Here are instructions on how to do this. This how-do is for the very basics of how to record the video using a cellphone. We’ll have separate how-tos on using webcams, on editing, how to post a premiere video, how to stream video live, and so on.
For this example, you are recording the video wholly off-line (not live). This means you can re-do the video as many times as you want until you have a result you’re happy with. Only then do you post that video for people to view.
Step 1: Setting Up the Area
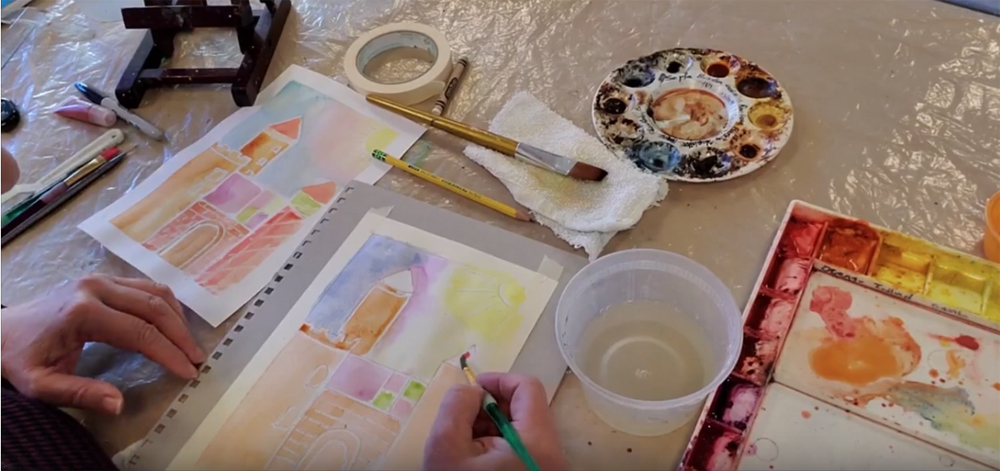
People who watch this video will want to be able to see what you are doing. There are two main formats people tend to use. One, used by Libia Goncalves with her how-to videos, involves the cellphone on a tripod, looking “over the artist shoulder”.
In comparison, there is the “across the room” layout, which shows the entire artist plus their easel with their artwork. This is the layout Laura Cenedella uses:
All of these were done with cellphones. It’s just a cellphone on a tripod. Different layout options are useful for different reasons. A close-up focuses just on the artwork. A “Bob Ross” style artist view lets the artist discuss ideas more clearly with the audience.
You’ll note that all three are oriented HORIZONTALLY. Always orient your video horizontally to be best suited to all viewing modes – TVs, computer monitors, and cell phones.
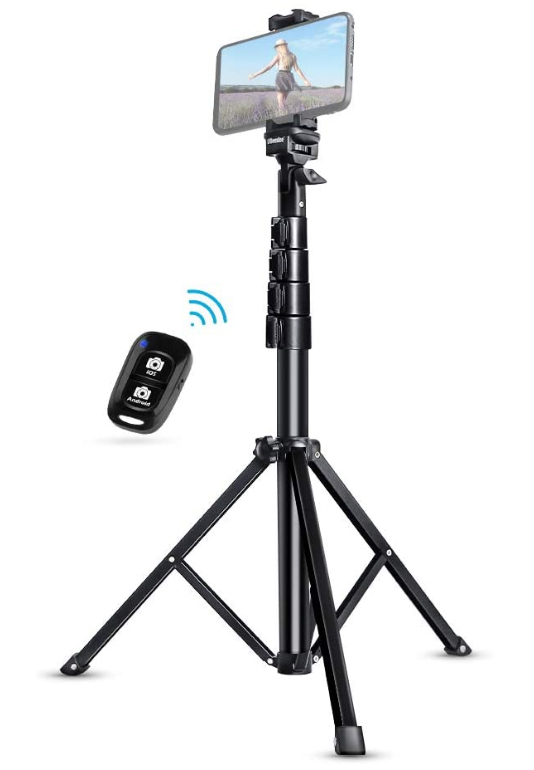
Here’s the cellphone-specific tripod Lisa is using:
It is incredibly easy to use and adjust. You just stick the cellphone into the top grippy arms and it’s set. It can telescope and angle. I use this for my computer webcam, too, so I can shoot videos of me painting at my desk.
Play with the lighting on your scene. Add extra lights to make it visible, if you need to. Do tests to see if the viewer can see the artwork clearly.
Bob Evans says: “Good lighting is important, doesn’t need to be anything fancy, some DIY clip on lights will work well, especially if bounced of a piece of white foam core board.”
Step 2: Making the Recording
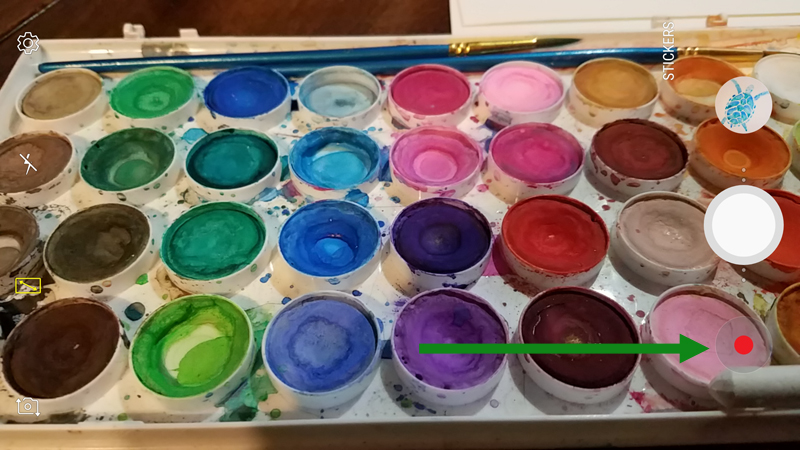
On your Android phone, it’s easy to record a video. Just click on your normal camera icon to open up your camera. Here is me pointing my Samsung Galaxy S7 at my watercolor tray.
See how there is the big white “take a picture” button at the right? Below that is a red dot. That red dot is your START button to record a video. Try it. Just click that red dot and record a short video of anything at all.
That’s all it takes to record a video. Open your camera app. Hit the red button. Press again to stop the video.
Bob Evans says: “For iPhone it’s basically the same, tap on ‘camera’ swipe to select video and push the red button, push again to stop.”
Practice a few times. Record short videos. You can delete them. See how it works.
Once you get the hang of making a short video, try making a video of you doing something art-related. You don’t need a tripod. You can just wedge your cellphone on a shelf or duct tape it or rubber band it to something. See how it works. Experiment. You can delete the videos. It doesn’t matter.
Step 3: Posting A Video
OK you’ve practiced, and experimented, and you’ve ended up with a 2-minute video of you painting a cloud. We would love to see your video! The more we all share with each other, the more we learn new techniques.
Here are a few ideas for posting your video.
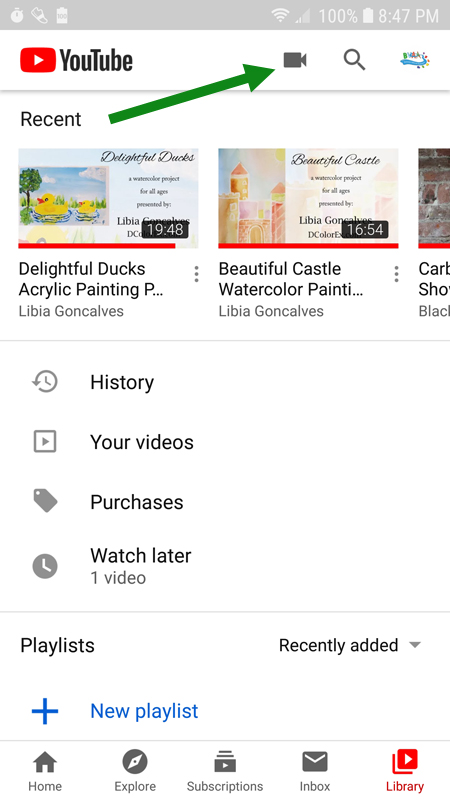
YouTube: This is enormously popular and doesn’t require a logon to watch. Create an account at YouTube.com. The upload button will be at the top right of the screen and looks like a video camera. YouTube is all about videos – that is what they do. Just click that upload button, give your video a title, and let us know when it’s live.
Facebook: Facebook does require a Facebook account to watch these videos, but the traffic on Facebook is phenomenal. Even if you post on YouTube, it’s good to also post your video on Facebook. The built-in sharing and publicity for videos here is fairly phenomenal. Even if you hate Facebook personally, consider creating a fan page here solely for use of promoting videos. To post a video on Facebook, just do your normal post typing, and click the ‘video’ button to attach a video to your post.
BVAA: If you have no interest of having yourself anywhere on line, let us know. We can post your videos to our BVAA pages. That way you don’t have to be online at all. We’ll get it live for you.
Step 4: Ask for Feedback!
We are all learning and experimenting here. We’re all trying different lighting angles, different camera angles, different layouts, and more. Ask members for suggestions. Watch other members’ videos and see what they’re trying.
The more we all help each other out, the more we all thrive!
Here are a few links to BVAA members’ cellphone videos, to see how these work:
Let us know if you are doing videos with a cellphone, so we can share your links! We’ll have additional articles which go into more advanced topics once you get the hang of simply making and posting a video.
For example, once you have a video, here is how to load it onto YouTube as a special Premiere Video Event, to get it more viewers.